
Pruning
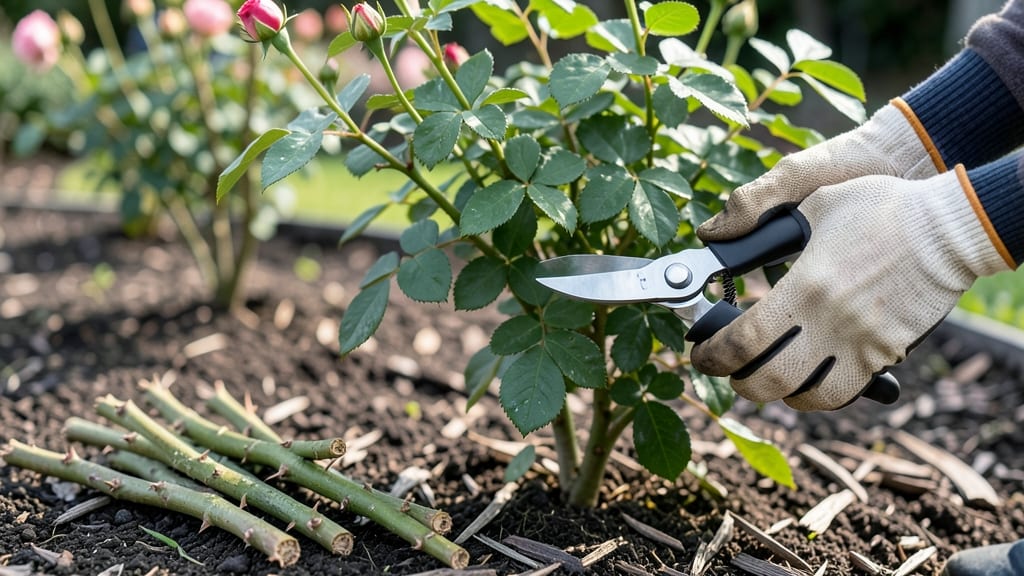
The best time of year to prune roses is late winter—when the ground is still frozen but buds are waking—is the best way to guarantee a season of lush canes and abundant blooms. ✂️ I learned this the hard way after pruning too early and watching my bushes struggle through spring.
The timing isn’t just about cutting branches; it’s about giving your roses the head start they need to thrive before pests and diseases wake up.
This is when roses enter dormancy, making them resilient to pruning while still allowing new growth to begin as temperatures rise. In colder climates, aim for late February to early March when frost is a distant memory but before buds swell.
Warmer regions can prune slightly later, but never after new leaves appear—those are your plant’s energy stores for the season. The key is to prune when you can see the bud eyes (those plump bumps where growth starts) but before they burst open.
What you’ll get is a bush that looks like it’s been professionally manicured, with strong canes ready to produce more blooms than ever before. The right cuts encourage airflow, reducing fungal diseases, and the fresh growth is less appealing to aphids and Japanese beetles.
Plus, your roses will bloom earlier and stay productive longer. Here’s how to do it without a single mistake.
For those in tropical climates where roses grow year-round, prune after the heaviest bloom cycle—usually late summer or early fall—to keep the plant from getting overloaded.
And if you’re unsure about your zone, just remember: prune when you can see the buds but not the leaves, and you’ll be golden. Let’s get those shears sharp and those canes ready for action!
📚 In This Guide
- What you need
- Instructions
- Tips and common mistakes
- Wrapping up and next steps
What you need
- ● Bypass pruners: Sharp, high-quality bypass pruners (4–6 inches) for clean cuts on smaller canes. Look for ergonomic handles and stainless steel blades.
- ● Loppers: Heavy-duty loppers (8–12 inches) for thicker stems (½–1½ inches). Opt for anvil-style or bypass—just ensure they’re sterilized with rubbing alcohol.
- ● Pruning saw: A curved-tooth pruning saw for stubborn, woody canes (1–3 inches thick). Avoid cheap models—they dull quickly!
- ● Gloves: Leather or heavy-duty gardening gloves (size medium/large) to protect against thorns and debris.
- ● Disinfectant: A 10% bleach solution (1 part bleach to 9 parts water) or rubbing alcohol (70%+) to sterilize tools between cuts and prevent disease.
- ● Rake or broom: For clearing fallen leaves/debris post-pruning (avoids hiding pests).
- ● Pruning sealant: Tree wound pruning paste (for large cuts on hybrid teas/climbers—controversial but some swear by it).
- ● Marking twine or flags: To label canes for future reference (helpful for complex roses).
- ● Safety glasses: If you’re really aggressive with the saw—thorns and debris fly!
- ● Weather check: Prune on a dry, cloudy day (or morning) when temps are above freezing (35°F/2°C+). Avoid pruning after rain.
- ● Tool prep: Sharpen blades before you start—dull tools crush stems, inviting disease.
- ● Clean workspace: Lay down tarps or cardboard to catch clippings and make cleanup easier.
Instructions for pruning roses at the perfect late-winter moment
Timing matters more than you think—prune too early and you risk frost damage; too late and you lose spring blooms.
⏰ Step 1: Wait for the Right Weather Window
Your goal is to prune when the ground is thawed but before new growth starts. In most climates, this means late winter to early spring, roughly 4-6 weeks before your last frost date. You'll know it's time when daytime temperatures hover around 40-50°F—warm enough to work comfortably, but cold enough that roses haven't yet broken dormancy.
Check for buds swelling at the base of canes—that's your signal to act fast. If you see green shoots poking through, you've waited too long. Pruning then stresses the plant and can reduce flowering. I always mark my calendar for February to early March in my zone 6 garden, but adjust for your climate's last frost date.
✂️ Step 2: Remove Dead, Diseased, or Weak Canes First
Grab your pruners and start by cutting out any canes that are completely dead, diseased, or crossing others. Dead canes are hollow and snap easily when bent; diseased ones have blackened spots or ooze. Make clean cuts at a 45-degree angle, about ¼ inch above an outward-facing bud—this encourages new growth to angle outward for better air circulation.
Don't worry about being gentle here. Roses reward aggressive pruning of weak canes. I like to bundle the removed canes and burn them (or bag them for trash pickup) to prevent spreading disease back to the plant. If you're unsure whether a cane is dead, scratch the bark—if it's green underneath, it's still alive and should stay.
🌿 Step 3: Shape the Bush for Airflow and Sunlight
Now focus on the remaining canes. Aim to leave 3-5 strong, healthy canes per bush, cutting back each to about 18-24 inches tall. Look for canes that grow outward from the center—these will form the new structure. Make your cuts just above a bud that faces the outside of the plant, using the 45-degree angle to prevent water from pooling on the wound.
Step back often to visualize the shape. You want an open center that lets sunlight and air reach all parts of the bush—this prevents fungal diseases like black spot. If your rose has a natural shape (like a climber or shrub), preserve that form. I always leave a few older canes if they're healthy; they provide stability and sometimes flower better than new growth.
💧 Step 4: Clean Up and Apply Post-Pruning Care
After pruning, rake up all fallen leaves and debris from around the base. This removes overwintering pests and fungal spores. Now's also the time to apply a 2-3 inch layer of mulch around the plant (but not touching the stem) to protect roots from freezing and retain moisture. I use shredded bark mulch because it breaks down slowly and improves soil structure over time.
Give the roses a light watering if the ground isn't saturated from recent rains. Avoid heavy watering immediately after pruning—it can wash away mulch and cause soil compaction. Instead, let nature do the work until new growth appears, which usually takes 2-4 weeks depending on your climate. Watch for fresh green shoots emerging from the buds you left behind—that's your confirmation the pruning worked!
Tips & tricks for perfect late-winter rose pruning
These game-changing tips will help you transform your roses into stronger, more vibrant plants that reward you with spectacular blooms all season.
Timing is Everything: The 4-6 week window before your last frost date isn't just a suggestion—it's a critical period when roses are still dormant but ready to respond. In my zone 6 garden, I've found that pruning between February 15th and March 1st gives the best results. If you're in a warmer climate, aim for late February to early March. Watch for those buds swelling at the base of canes—they're your green light to prune! If you see any green shoots emerging, you've waited too long, and the plant will stress from the shock.
Pruning Angle Matters: That 45-degree angle isn't just for show—it's a strategic move! Cutting at this angle prevents water from pooling on the wound, which could lead to rot or disease. When you make your cuts about ¼ inch above an outward-facing bud, you're essentially telling the plant where to grow next. I always visualize the new cane growing outward from the center, creating that perfect open structure for airflow and sunlight. This simple technique can make all the difference in your roses' health and flowering potential.
Don't Overlook the Cleanup: After you've finished pruning, the cleanup is just as important as the cutting. Raking up all those fallen leaves and debris removes overwintering pests and fungal spores that could reinfect your roses. I've seen many gardeners skip this step, only to have their carefully pruned roses develop black spot later in the season. Plus, that 2-3 inch layer of mulch you apply afterward works like a protective blanket for your roots, keeping them cozy and moist through those late winter thaws and early spring freezes.
Patience Pays Off: Those 2-4 weeks until you see new growth might feel like an eternity, but resisting the urge to check constantly is key. Heavy watering right after pruning can actually wash away your mulch and compact the soil, creating a barrier between roots and moisture. Instead, let nature take its course. I've learned the hard way that rushing the post-pruning care can set back your roses' recovery. Trust the process—those fresh green shoots emerging from the buds you left behind are your reward for doing it right.
Pro Tips for Best Time Of Year To Prune Roses
- These game-changing tips will help you transform your roses into stronger, more vibrant plants that reward you with s...
- Timing is Everything: The 4-6 week window before your last frost date isn't just a suggestion—it's a critical period ...
- Pruning Angle Matters: That 45-degree angle isn't just for show—it's a strategic move! Cutting at this angle prevents...
Frequently asked questions
Got questions about pruning roses? You’re not alone! Here are some of the most common concerns—plus expert answers to help you prune like a pro.
What if I miss the late-winter pruning window—can I still prune my roses?
Yes! While late winter (just before new growth starts) is ideal, you can prune roses in early spring or even summer after they’ve finished blooming. Avoid heavy pruning in fall, though—it can stress plants before winter. Just adjust your cuts to encourage healthy regrowth.
Can I prune roses if there’s still snow on the ground?
Not a problem! Prune when the ground is workable but before buds swell (usually when daytime temps hover around 40°F). Snow cover won’t hurt your roses—just brush it away from the canes before you start. Cold, dormant plants handle pruning better than soggy or thawing ones.
How do I know if I’ve pruned my roses too much?
Over-pruning shows up as bare stems or no new buds in spring. Aim to leave 3–5 strong canes (about pencil-thick) per bush, with 3–5 buds per stem. If your roses look skeletal, next year’s pruning should be lighter. Think of it like a haircut—better to leave a little more than too little!
Do I need to sterilize my pruners between cuts?
Sterilizing tools with rubbing alcohol or a 10% bleach solution prevents spreading disease (like black spot or powdery mildew). Wipe blades before and after pruning each rose, especially if you’re working with sickly plants. It’s a small step that keeps your garden thriving!
Will pruning now affect my roses’ blooms this summer?
Not if done right! Late-winter pruning boosts summer blooms by removing dead wood and encouraging strong new growth. Just avoid heavy cuts on repeat-blooming varieties (like hybrid teas) in early spring—they’ll still have time to rebound. Patience pays off with bigger, healthier flowers later!
Wrapping up and next steps
Pruning roses in late winter—just before new growth begins—is your secret weapon for healthier canes, bigger blooms, and fewer pests. 🌱 Whether you’re tackling hybrid teas, climbers, or shrub roses, timing and technique make all the difference.
Now that you’ve got the when, why, and how, grab those shears and transform your garden into a flourishing paradise!
Ready to level up your rose care? Start by marking your calendar for February or early March (adjust for your climate!) and gather your tools. Your roses will thank you—with vibrant, long-lasting blooms all season long. 🌸