
Pruning
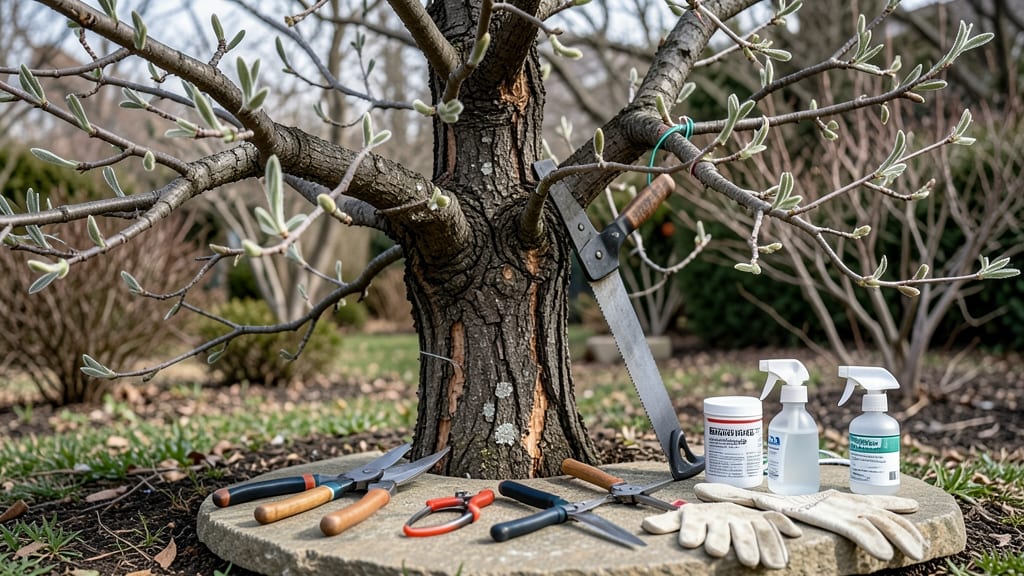
Pruning almond trees isn't just about hacking away branches—it’s the secret to bountiful harvests and a healthy tree. 🌿 I’ve spent years watching my own almond trees transform from tangled messes into productive, open-canopied powerhouses, all thanks to the right cuts at the right time.
The key is working with the tree’s natural growth cycle: dormant-season pruning (winter) for major structural changes, and light summer pruning to encourage fruit production.
Most gardeners skip the summer work, but that’s where you unlock the best nut yields—thinning out crowded branches lets sunlight and air reach the center, reducing disease and boosting fruit size. You’ll end up with a tree that produces thicker nuts, fewer blank branches, and easier access for harvest.
The best part? Even if you’ve never pruned before, these techniques are foolproof once you know the basics—no green thumb required, just sharp tools and a clear plan. Here’s where it gets interesting: the tools you use make all the difference.
A clean, sharp bypass pruner is non-negotiable, and you’ll want gloves to handle the thorns. Ready to turn your almond tree into a nut-producing machine?
📚 In This Guide
- What you need
- Instructions
- Tips and common mistakes
- Wrapping up and next steps
What you need
- ● Pruning shears (bypass or anvil type) – Sharp, clean, and designed for small to medium branches (1/4"–3/4" diameter).
- ● Loppers – For thicker branches (3/4"–1.5" diameter). Look for bypass-style for cleaner cuts.
- ● Pruning saw – For branches larger than 1.5" in diameter. Choose a curved blade for ease.
- ● Gloves – Heavy-duty, cut-resistant gloves to protect your hands from thorns and rough bark.
- ● Disinfectant (70% isopropyl alcohol or bleach solution) – To sterilize tools between cuts and prevent disease spread.
- ● Rag or paper towels – For wiping tools clean before and after use.
- ● Ladder or step stool – If your tree is taller than 6 feet. Ensure it’s stable and extends at least 3 feet above the highest branch.
- ○ Marking twine or flags – Optional but helpful for labeling branches to remove or keep.
- ● Heavy-duty trash bags – For collecting pruned branches and debris.
- ○ Tree wound dressing (optional) – Only use if your tree has large wounds; otherwise, let cuts heal naturally.
- ● Safety glasses – To protect your eyes from debris, especially when using a pruning saw.
- ● Pole pruner – For high branches that are difficult to reach with a ladder.
- ● Notebook & pen – To sketch a quick map of your tree’s structure before pruning.
Step-by-Step guide to pruning almond trees for optimal growth
Pruning almond trees isn't just about shaping—it's about unlocking their full potential for fruit production.
✂️ Step 1: Identify the Right Time for Each Pruning Phase
Almond trees have distinct pruning windows. Start with dormant season pruning in late winter (February-March) before buds swell but after the worst cold snaps. This removes dead wood and opens the canopy for better air circulation and sunlight penetration. I always check the local frost dates first—pruning too early risks damaging tender new growth.
Next comes summer pruning in June-July to control vigorous growth and shape the tree. This is when you'll thin out crowded branches to improve nut development. Finally, light maintenance pruning in fall removes any water sprouts or diseased branches that appear after summer's growth spurt. Never prune in fall if your region has harsh winters—you'll leave wounds vulnerable to frost damage.
🌿 Step 2: Remove Dead, Diseased, or Crossing Branches First
Grab your sharp bypass pruners and start at the top. Look for dead branches—they'll be brittle, lack bark, and snap easily when bent. Cut these back to the nearest healthy lateral branch or bud. Diseased branches show as discolored, oozing, or fungal-covered—remove these completely down to the trunk collar. I always sterilize my tools between cuts with rubbing alcohol to prevent spreading pathogens.
Next tackle crossing branches where limbs grow toward each other. These rub and create wounds that invite disease. Choose the weaker branch (usually the smaller one) and cut it out completely at its point of origin. If both are equal, remove the one growing downward. You'll know you're doing this right when the tree's structure starts looking more open and sun can penetrate all the way to the center.
☀️ Step 3: Thin the Canopy for Better Airflow and Light
Your goal here is to create an open-centered vase shape that lets sunlight reach all fruit-bearing branches. Start by removing suckers—those vigorous shoots growing from the base or along the trunk. These drain energy from nut production. Then look for water sprouts—straight, fast-growing vertical shoots. These rarely produce fruit and should be cut back to a lateral branch or bud.
For mature trees, remove up to 20% of the canopy in any given year. Focus on branches that are too crowded—you'll see clusters of leaves with little sunlight reaching the center. Cut these back to a healthy lateral branch that's growing outward. I like to make my cuts just above an outward-facing bud so the new growth continues the tree's natural shape rather than growing inward.
⏰ Step 4: Shape for Fruit Production and Structural Strength
Almond trees produce nuts on spurs—short, stubby branches that develop along the main limbs. To encourage these, prune to maintain 4-6 foot spacing between major scaffold branches. Cut back any branches that grow too close together, always making cuts at a 45-degree angle just above a bud that's facing outward.
For young trees, establish a strong central leader by removing competing vertical branches. Mature trees benefit from heading back overly vigorous branches by one-third to encourage bushier growth. I always step back every few cuts to visualize the tree's shape—you want a balanced silhouette that catches sunlight from all angles while maintaining structural integrity against winter winds.
🪴 Step 5: Clean Up and Protect the Tree
After pruning, remove all debris from under the tree—those fallen branches harbor pests and diseases. I use a tarp to collect all clippings for composting (just keep them away from the tree base). Then apply a wound dressing only to large cuts over 2 inches in diameter. For smaller cuts, let them heal naturally—they'll form callus tissue faster without the dressing.
Finally, give your tree a deep watering to help it recover from the stress of pruning. In dry climates, I add 2-3 inches of mulch around the base (but keep it 6 inches away from the trunk) to retain moisture. This is especially important after summer pruning when the tree is putting on new growth. Watch for new shoots emerging from the pruning cuts within 4-6 weeks—this is your sign the tree is responding well.
Tips & tricks for perfect almond tree pruning
These game-changing insights will help you transform your almond tree from a tangled mess into a productive powerhouse.
Seasonal Timing Precision: In Step 1, when planning your late winter pruning (February-March), check your local frost dates with your agricultural extension service—they'll provide exact dates for your microclimate. I've seen trees in Southern California ready for pruning by mid-January, while Northern California orchards need to wait until late March. This precise timing prevents frost damage to newly exposed buds while maximizing dormant season benefits.
Tool Sterilization Strategy: The instructions mention sterilizing tools between cuts, but here's what nobody tells you—use a 10% bleach solution (1 part bleach to 9 parts water) for 30 seconds between diseased branches, then rinse thoroughly. I keep a small spray bottle of this solution in my pruning kit during the growing season. For fire blight or bacterial canker, you might need to heat-clean your tools in a 200°F oven for 30 minutes between trees to completely eliminate pathogens.
Canopy Architecture Secret: When thinning in Step 3, aim to create what arborists call a "modified central leader" shape—this means keeping one dominant vertical branch while allowing 3-4 equally spaced lateral branches to develop. The 4-6 foot spacing mentioned in Step 4 should be measured from the trunk to the outer edge of each scaffold branch. This balanced structure catches sunlight from all angles while preventing wind damage, which is critical for nut production in coastal areas where prevailing winds are strong.
Wound Management Insight: For cuts larger than 2 inches (Step 5), I've found that applying a tree wound sealant containing copper-based fungicide creates a better barrier than plain wound dressing. The key is to apply it within 24 hours of pruning while the wound is still fresh. This prevents silver leaf fungus from entering through large cuts. For smaller cuts, let nature take its course—the tree's natural callus formation is actually more effective than any commercial dressing at preventing disease entry.
Pro Tips for Prune Almond Trees
- These game-changing insights will help you transform your almond tree from a tangled mess into a productive powerhouse.
- Seasonal Timing Precision: In Step 1, when planning your late winter pruning (February-March), check your local frost...
- Tool Sterilization Strategy: The instructions mention sterilizing tools between cuts, but here's what nobody tells yo...
Frequently asked questions
Got questions about pruning almond trees? You’re not alone! Here are answers to the most common concerns—so you can prune with confidence and keep your tree thriving.
When is the best time to prune almond trees?
The ideal window is late winter or early spring (just before buds swell), when the tree is dormant but pests are less active. Avoid pruning in fall—it can leave wounds vulnerable to disease. For young trees, light pruning in summer (after harvest) can encourage growth, but never prune during frost or extreme heat.
How much should I prune an almond tree each year?
Remove no more than 20-30% of the canopy per year to avoid stress. Focus on:
- Dead, diseased, or crossing branches (prune first!)
- Suckers or water sprouts (vigorous vertical shoots)
- Overcrowded limbs to improve airflow
What if I see sap oozing after pruning?
Sap bleeding is normal for 1–2 weeks post-prune, especially in young trees. To minimize it:
- Prune on dry days (not rainy)
- Avoid cutting into large branches (>2" diameter)
- Seal cuts with pruning sealant (optional) if concerned about pests
Can I prune almond trees without tools like a saw?
For small branches (up to ½"), hand pruners or loppers work great. For thicker limbs, a pruning saw is a must—almond wood is hard and can dull blades quickly. Never use hedge trimmers; they tear bark and invite disease. If you’re uncomfortable with a saw, hire a local arborist for heavy cuts!
Will pruning reduce my almond harvest?
Not if done right! Proper pruning boosts yields by:
- Improving sunlight penetration to fruit-bearing branches
- Reducing competition for nutrients
- Opening the canopy to prevent mold or rot
How do I tell if I’ve over-pruned?
Watch for these red flags:
- Wilting or yellowing leaves (sign of stress)
- No new growth by late spring
- Excessive sap or bleeding wounds that don’t heal
Wrapping up and next steps
Pruning your almond tree doesn’t have to be intimidating—with the right timing, tools, and techniques, you’ll boost fruit production and keep your tree thriving for years. Remember: patience is key—focus on gradual shaping, prioritize air circulation, and always sanitize your tools to avoid disease.
Whether you’re a seasoned gardener or just starting, every trim brings you closer to that golden harvest!
Ready to take the next step? Bookmark this guide and schedule your first pruning session—your future almond crop will thank you! 🌱💛