
Pruning
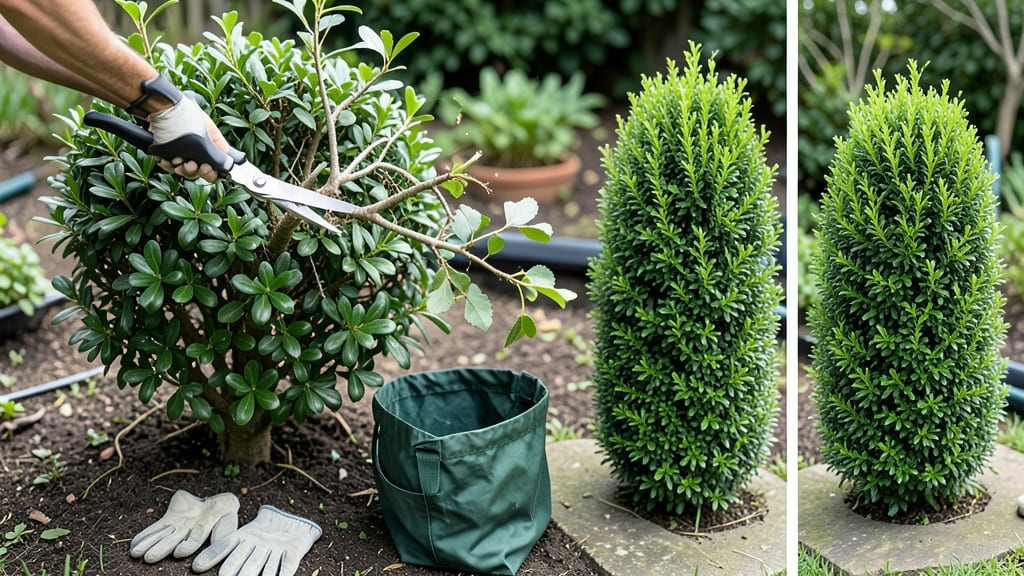
Hard pruning boxwoods isn't just about hacking away at overgrown shrubs—it's the secret to bringing them back from the brink of leggy, sparse messes. 🌿 I’ve turned my own boxwoods from sad, scraggly shadows into thick, lush hedges with just a few strategic cuts, and the best part?
You can do the same, even if your boxwoods look like they’ve given up.
The key is timing: late winter or early spring, when the plant is dormant but ready to burst with new growth.
Grab your loppers, gloves, and a sharp pair of pruners—no dull blades here—and focus on cutting back one-third to one-half of the oldest, thickest stems all the way to the ground.
This might sound drastic, but boxwoods are tougher than they look, and they’ll reward you with fresh, vibrant growth within weeks.
What you’ll end up with is a boxwood that looks like it just stepped out of a perfectly manicured garden—thicker, fuller, and ready to handle years of shaping without the stress. The first flush of new growth is shockingly lush, and by summer, you’ll barely recognize your once-neglected shrubs.
Plus, this method works for both formal hedges and informal shrub borders, so no matter your style, your boxwoods will thank you.
Now, here’s the thing—this works best if you’re willing to commit to a little patience and a lot of trust in the process. Boxwoods might take a season or two to fully recover, but the payoff is worth it.
And if you’re worried about making mistakes? Don’t be. Boxwoods are forgiving, and even if you overdo it a little, they’ll bounce back with the right care. Let’s get those shrubs looking their best again!
📚 In This Guide
- What you need
- Instructions
- Tips and common mistakes
- Wrapping up and next steps
What you need
- ● Pruning shears: Bypass pruners (sharp, clean, and not dull!) for clean cuts on smaller branches.
- ● Loppers: 8–10 inch loppers for thicker stems (up to 1.5 inches in diameter).
- ○ Hand pruners (optional): For precision trimming on delicate new growth.
- ● Hedge shears: Long-handled shears (18–24 inches) for shaping larger boxwoods or hedges.
- ● Pruning saw: Curved-tooth saw for cutting through stubborn, thick branches (2–4 inches in diameter).
- ● Gloves: Heavy-duty gardening gloves (nitrile or leather) to protect against thorns and rough edges.
- ● Disposable pruning bags: 1–2 bags (10–15 gallon capacity) to collect clippings and reduce mess.
- ● Ladder or step stool: If your boxwoods are taller than 5–6 feet, a sturdy ladder (with stabilizers) is a must.
- ● Safety glasses: Protect your eyes from flying debris.
- ● Long sleeves/pants: Wear protective clothing to avoid scratches from boxwood spines.
- ● Rake or broom: For clearing up fallen leaves and debris after pruning.
- ○ Hose with nozzle (optional): To clean tools and rinse off sap or sap-sucker residue.
- ○ Pruning sealant (optional): For sealing large cuts (1 inch or wider) to prevent disease entry.
- ● Timing: Prune in late winter or early spring (before new growth starts) or after flowering (if applicable). Avoid pruning in fall.
- ● Weather check: Choose a dry, calm day to avoid fungal growth from wet cuts.
- ● Healthy boxwoods: Ensure your shrubs are not stressed by drought, pests, or disease before hard pruning.
Instructions for hard pruning boxwoods
Revitalizing boxwoods is easier than you think—just follow these steps to transform overgrown shrubs into lush, vibrant plants.
✂️ Step 1: Time It Right for Optimal Recovery
Prune boxwoods in late winter or early spring, just as new growth begins but before buds break. This timing ensures your shrubs have the entire growing season to recover and fill back in. I always mark my calendar for February or early March—this gives roots time to heal before summer heat stress.
Never prune in fall or winter when the plant is dormant. You'll risk exposing tender new growth to winter dieback. If you missed the window, wait until late spring, but expect slower recovery. Watch for first green buds on stems—that's your cue.
✂️ Step 2: Gather the Right Tools for Clean Cuts
Use sharp, clean pruning shears (not hedge trimmers) for precise cuts. Dull blades crush stems and create jagged wounds that invite disease. I sterilize my shears with rubbing alcohol between cuts to prevent spreading bacteria. For larger branches, grab your pruning saw—never tear wood with your hands.
Keep a bucket of soapy water nearby to soak pruned branches. This prevents them from blowing around your yard and keeps your workspace tidy. Wear gloves—boxwood leaves can be prickly, and sap might irritate sensitive skin. A small hand saw works for stubborn branches thicker than ½ inch.
✂️ Step 3: Cut Back Strategically for Shape and Health
Start by removing dead, diseased, or crossing branches first—these are your priority. Cut just outside the branch collar (the swollen area where the branch meets the stem) at a 45-degree angle. This promotes faster healing. For thick branches, make a small notch on the underside first to control the cut.
Next, thin out the center to improve airflow. Aim to remove ⅓ of the oldest growth from the shrub's interior. You'll see dense, woody stems—these are the ones slowing down your boxwood's growth. Step back often to check your progress; the goal is an open, airy shape that lets light reach all parts of the plant.
✂️ Step 4: Refine the Outer Shape for a Polished Look
Now shape the outer edges with gentle, sweeping cuts. Boxwoods respond well to gradual shaping—avoid shearing entire sections at once. Cut just outside the leaf bud or new growth to encourage fuller regrowth. I like to work in 3-inch sections, stepping back after each cut to maintain symmetry.
For formal hedges, use a hedge trimmer to create clean lines, but leave some natural texture. Over-shearing removes too much leaf surface, which can stress the plant. If you're unsure, err on the side of leaving more foliage—boxwoods bounce back surprisingly well. Watch for small green shoots appearing within weeks of pruning—that's your sign it's working!
💧 Step 5: Care for Pruned Boxwoods After the Cut
Water deeply right after pruning to help the plant recover. Soak the root zone until water runs out the drainage holes—this encourages new root growth. I give my boxwoods 1-2 inches of water weekly during the first growing season post-prune. Mulch around the base with 2-3 inches of organic mulch to retain moisture and protect roots.
Fertilize lightly with a balanced, slow-release fertilizer (10-10-10) in early spring to support new growth. Avoid heavy nitrogen—it promotes leafy growth at the expense of root development. You'll notice new buds forming within 4-6 weeks if everything's on track. Keep an eye out for yellowing leaves, which can signal over- or under-watering.
Tips & tricks for perfect boxwood pruning
Transforming overgrown boxwoods into showstoppers takes the right approach—and these insider tricks make all the difference.
Timing is Everything: The late winter/early spring window (February-March) is non-negotiable for maximum recovery. I've seen boxwoods pruned too early in winter suffer from winter dieback—those tender new shoots freeze before they can harden off. If you miss this window, late spring works but expect slower regrowth. Pro tip: Check for those first green buds—they're your perfect signal to start.
Tool Prep Prevents Problems: Sterilizing your pruning shears between cuts isn't just about hygiene—it's about your boxwood's health. I keep rubbing alcohol in a small spray bottle by my work area and wipe blades after every 3-4 cuts. For branches thicker than ½ inch, that hand saw becomes your best friend. I've ruined too many cuts trying to force thick branches through shears—always use the right tool for the job!
Shape with Purpose: When thinning the center (that's where ⅓ of the oldest growth lives), think "air circulation." I visualize sunlight streaming through the branches—this is how you know you're doing it right. For formal hedges, work in those 3-inch sections, stepping back after each cut. The key is gradual shaping—boxwoods respond better to patience than aggression. You'll know you're on track when you see those tiny green shoots appearing within weeks.
Post-Prune Care Makes the Difference: That deep watering right after pruning isn't just a suggestion—it's essential. I've seen boxwoods wilt dramatically after pruning when they didn't get this critical first watering. The 1-2 inches weekly during the first growing season keeps roots happy, and that 2-3 inches of organic mulch is like a cozy blanket for your plant's roots. Don't skip the mulch—it's the secret to faster recovery.
Pro Tips for Hard Pruning Boxwoods
- Transforming overgrown boxwoods into showstoppers takes the right approach—and these insider tricks make all the difference.
- Timing is Everything: The late winter/early spring window (February-March) is non-negotiable for maximum recovery.
- Tool Prep Prevents Problems: Sterilizing your pruning shears between cuts isn't just about hygiene—it's about your boxwood's health.
Frequently asked questions
Got questions about hard pruning boxwoods? You’re not alone! Here are answers to the most common concerns—whether you’re a seasoned gardener or a newbie ready to transform your overgrown shrubs.
When is the best time to hard prune boxwoods?
Hard prune boxwoods in late winter or early spring (just before new growth starts). Avoid cutting in fall—it leaves them vulnerable to winter damage. If your boxwoods are severely overgrown, you can do a gradual prune over 2–3 years for less stress.
How much can I cut off safely?
You can safely remove up to ⅓ of the plant’s total growth in one season. For dense boxwoods, aim to reduce the canopy by about 25–30% to encourage bushier regrowth. Never cut into old, woody stems—focus on new, green growth for best results.
Will hard pruning kill my boxwoods?
If done correctly, no—boxwoods are resilient! However, avoid cutting into bare wood (no leaves or green growth) or removing more than ⅓ of the plant at once. Water deeply after pruning, and mulch to protect roots. Over-pruning in one go can stress the plant, but gradual cuts promote recovery.
What if my boxwoods look ragged after pruning?
Don’t worry—boxwoods often fill in quickly! If the shape is uneven, do a light touch-up prune in early summer to refine. For a cleaner look, use hand pruners for small cuts and loppers for thicker branches. Avoid shears—they crush stems and leave jagged edges.
Are there alternatives to hard pruning for overgrown boxwoods?
Yes! If hard pruning feels too drastic, try thinning from the inside—remove select branches from the center to improve airflow and light penetration. You can also layer or propagate cuttings from healthy growth. For severely neglected shrubs, consider replacing them if they’re past revival.
Wrapping up and next steps
Hard pruning boxwoods might seem intimidating, but with the right tools, timing, and technique, you can transform dense, overgrown shrubs into lush, vibrant plants—or even encourage new growth from old wood! Remember, patience and precision are key, so take your time and enjoy the process.
Once you’ve mastered this method, why not experiment with shaping or even propagating cuttings? Your garden (and your green thumb) will thank you! 🌿✂️