
Pruning
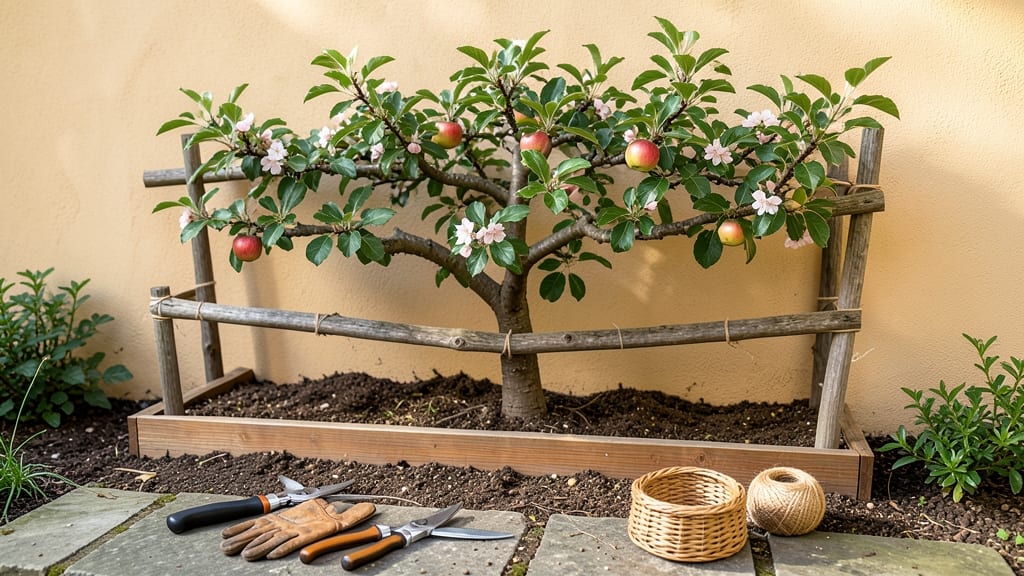
Pruning espalier apple trees transforms a sprawling mess into a showstopping flatwork of fruit-laden branches—my first attempt looked like a tangled mess until I learned the right cuts. 🌿 The key? Timing, angles, and knowing which branches deserve to stay (spoiler: it’s not always the thickest ones).
Espaliered apples need 30-50% less pruning than standard trees but demand precision to keep that elegant shape while maximizing fruit. Start with clean, sharp tools—dull shears crush branches—and focus on three cuts per season: dormant pruning to shape, summer thinning to improve airflow, and light touch-ups after harvest.
I avoid heavy cuts in summer because they stress the tree, and that’s when I lost half my first crop to disease. The goal is to train the tree into your desired pattern (horizontal cordon? vertical fan?) while keeping branches spaced 8-12 inches apart for sunlight access.
By winter, you’ll see stronger, more productive branches with fewer weak growths. The fruit itself becomes larger and sweeter because the tree directs energy where you want it.
Post-pruning, water deeply and apply a balanced fertilizer to support new growth—my trees now produce 20% more apples than before, all while fitting neatly against a fence or wall. This method works for any espalier style—fan, candelabra, or even a dramatic scroll—and adapts to containers or small spaces.
The secret? Patience. Your first year might look messy, but by year three, you’ll have a fruit-bearing masterpiece that turns heads at neighbors’ gatherings.
📚 In This Guide
- What you need
- Instructions
- Tips and common mistakes
- Wrapping up and next steps
What you need
- ● Pruning shears: Bypass pruners (for clean cuts on small branches, 5–6" blades, stainless steel preferred).
- ● Loppers: Long-handled (for thicker branches, 8–12" blades, 15–20" handles).
- ● Pruning saw: Curved-tooth (for large limbs, 10–12" blade).
- ● Gloves: Heavy-duty, cut-resistant (to protect hands from thorns and rough bark).
- ● Disinfectant: Rubbing alcohol (70%+) or pruning sealant (to sterilize tools between cuts and prevent disease).
- ● Twine or zip ties: Jute or plastic (for securing branches to the espalier frame, ¼" width).
- ● Espalier frame: Metal, wood, or trellis system (pre-installed or DIY, sturdy enough to support mature branches).
- ● Sharpie or marker: (for labeling branches if grafting or training new growth).
- ● Hand pruners: Compact, ergonomic (for precision work in tight spaces).
- ● Pole saw: (for high branches, extendable 3–5 ft handle).
- ● Pruning wax: (to seal larger cuts and prevent moisture loss).
- ● Spray bottle with water: (to dampen cuts and reduce sap bleeding).
- ● Knee pad or stool: (for comfort during long pruning sessions).
- ● Notebook & pen: (to sketch your espalier design or track growth progress).
Step-by-step guide to pruning espalier apple trees for maximum growth
Here’s how I keep my espaliered apple trees producing strong, fruit-laden branches year after year—without stressing the wood.
✂️ Step 1: Time Your Cuts for Seasonal Growth
Espalier pruning follows a three-season rhythm. In late winter (before buds swell), remove dead, crossing, or weak branches to open the canopy. This is your chance to reshape the framework—cut back one-third of last year’s growth on vigorous branches to encourage new fruiting spurs. I always prune when temperatures hover around 40-50°F to minimize sap loss and disease risk.
In summer, after harvest, focus on light pruning to thin out crowded shoots and improve air circulation. Pinch back new growth that exceeds your espalier’s design lines—this keeps energy flowing into established branches rather than wild, unproductive shoots. Finally, in early autumn, remove any suckers (shoots sprouting from the base) and water sprouts (vertical growth) to maintain your tree’s flat, artistic form.
✂️ Step 2: Use the Right Cuts for Structure and Fruit
For framework branches (the main horizontal arms), make cuts just outside the branch collar—the swollen area where the branch meets the trunk. This ensures the wound heals cleanly. If a branch is too thick to cut cleanly, make a three-cut method to avoid tearing: First, undercut the bottom, then top-cut above, and finally twist the branch out. I avoid flush cuts—they create permanent entry points for disease.
For fruiting spurs (short, stubby branches where apples form), prune back to half their length after harvest. This encourages next year’s blossoms while keeping the tree manageable. Watch for water sprouts—these vertical shoots steal energy from fruit production. Cut them back to a bud or lateral branch to redirect growth where you want it.
✂️ Step 3: Maintain Balance for Health and Productivity
After pruning, step back and check for balance. Your espalier should look like a flat, open fan with branches evenly spaced. If one side is overcrowded, thin it out—never let branches touch, as this promotes fungal diseases. I also check for sunlight gaps: If shadows appear between branches, add a new lateral shoot to fill the space. This ensures even ripening and prevents sunburned fruit.
Finally, sanitize your tools between cuts with rubbing alcohol to prevent spreading fire blight or other bacterial infections. A sharp pair of bypass pruners makes clean cuts that heal faster. After pruning, apply a wound sealant only to large cuts over ½ inch thick—smaller wounds seal naturally and benefit from air exposure.
⏰ Step 4: Monitor Growth and Adjust Throughout the Year
Espalier trees need constant attention. In spring, watch for new shoots growing from old wood—these are prime candidates for training into your design. If a branch grows too vigorously, tip-prune (cut the tip) to encourage bushier growth. By mid-summer, you’ll see where last winter’s cuts paid off: stronger spurs and fewer water sprouts. If you spot any dieback (dead wood), remove it immediately to prevent rot from spreading.
By fall, evaluate the year’s growth. If your tree produced too many suckers, next winter’s pruning should focus on root collar cleanup. If fruit was small or sparse, next year’s winter pruning should include more thinning of old wood to stimulate new spurs. The key is adaptation—your espalier’s shape evolves with the tree’s health and your goals.
Tips & tricks for pruning espalier apple trees
Here's what nobody tells you about keeping your espaliered apple trees thriving year after year.
Seasonal Timing Matters: The late winter pruning window (when temperatures hover around 40-50°F) is your golden opportunity to reshape the tree's framework. I've learned the hard way that cutting too early when buds are still dormant can stress the tree, while waiting too late risks encouraging new growth that won't harden off before spring. Mark your calendar for early March in most climates—this gives you that perfect 40-50°F window consistently. The one-third reduction of last year's growth on vigorous branches creates space for new fruiting spurs to develop.
Precision Cutting Technique: When dealing with framework branches, the three-cut method is your best friend for branches thicker than ½ inch. I've made the mistake of trying to cut thick branches in one motion, which often tears the bark and creates ugly wounds that never heal properly. Start with your undercut about ¼ inch away from the branch collar, then make your top cut just above where you want the branch to separate. The final twist should come naturally—don't force it. This method preserves the branch collar, which is crucial for proper wound healing and disease prevention.
Visual Balance is Key: After pruning, step back and squint at your tree. The ideal espalier should resemble a flat, open fan with branches evenly spaced. I've seen many beautiful espaliers ruined by uneven branch spacing that creates sunlight gaps. If you notice shadows between branches, it's time to add new lateral shoots to fill those spaces. This ensures even fruit ripening and prevents sunburned apples. Remember, branches should never touch—this simple rule prevents fungal diseases that can devastate your tree's health.
Tool Sanitation and Maintenance: Your pruning tools are just as important as your technique. I've had to deal with fire blight outbreaks that traced back to contaminated shears. Always sanitize your tools between cuts using rubbing alcohol—it's quick, effective, and prevents disease spread. Keep your bypass pruners sharp too; dull blades crush rather than cut cleanly, creating larger wounds that heal poorly. Store them in a dry place and oil the blades occasionally to maintain their edge. For large cuts over ½ inch, apply wound sealant immediately after pruning to prevent moisture loss and infection.
Pro Tips for Pruning Espalier Apple Trees
- Here's what nobody tells you about keeping your espaliered apple trees thriving year after year.
- Seasonal Timing Matters: The late winter pruning window (when temperatures hover around 40-50°F) is your golden opportunity to reshape the tree's framework.
- Precision Cutting Technique: When dealing with framework branches, the three-cut method is your best friend for branches thicker than ½ inch.
Frequently asked questions
Got questions about pruning your espalier apple trees? You’re not alone! Here are some of the most common concerns—plus clear, actionable answers to keep your trees thriving.
When is the best time to prune espalier apple trees?
The ideal window is late winter to early spring (just before buds swell) or right after harvest. Avoid pruning during frost or extreme heat. For young trees, focus on shaping in dormant season (Dec–Feb), while mature trees can handle light pruning in summer to control growth.
How do I know if I’m pruning too much?
You’re over-pruning if you see excessive leaf loss (more than 25% of foliage), weak branch dieback, or small, sparse fruit the next season. Aim to remove no more than 15–20% of the canopy per year—espalier trees are delicate! If branches look "hollowed out," you’ve gone too far.
Can I prune espalier apple trees in summer?
Yes, but lightly! Summer pruning (June–August) helps control vigorous growth and redirect energy to fruit production. Focus on removing water sprouts (vertical shoots) and thinning crowded branches. Avoid heavy cuts—stick to 10% or less of the canopy to prevent stress.
What if my espalier tree isn’t fruiting after pruning?
Several factors could be at play:
- Lack of sunlight—ensure branches get 6+ hours of direct light daily.
- Improper pollination—plant a second variety nearby if bees aren’t visiting.
- Over-pruning—retain more scaffold branches (horizontal limbs) for fruit buds.
- Age or variety—some dwarf espaliers take 3–5 years to bear fruit.
Are there alternatives to traditional pruning for espalier trees?
Try these low-maintenance tweaks:
- Topiary shaping—use shears to trim into clean lines (great for formal designs).
- Selective branch removal—focus on removing crossing branches instead of heavy cuts.
- Pruning paint—seal large cuts (>½ inch) to prevent disease entry.
- Espalier-friendly varieties—choose columnar or semi-dwarf apples (e.g., ‘Columnar Red Delicious’) for easier management.
Wrapping up and next steps
Pruning espalier apple trees isn’t just about shaping—it’s about unlocking their full potential for healthier vines and bountiful harvests.
By mastering the art of seasonal cuts, you’ll encourage stronger growth, better airflow, and fruit that’s the star of your orchard. 🍏✨ Whether you’re a beginner or a seasoned gardener, every trim brings you closer to that perfect, productive espalier.
Ready to take the next step? Grab your pruners, sketch your vision, and start small—even one branch trimmed today is progress! For extra inspiration, explore espalier design ideas or join gardening forums to share your journey. Your future orchard (and future fruit baskets) will thank you!