
Pruning
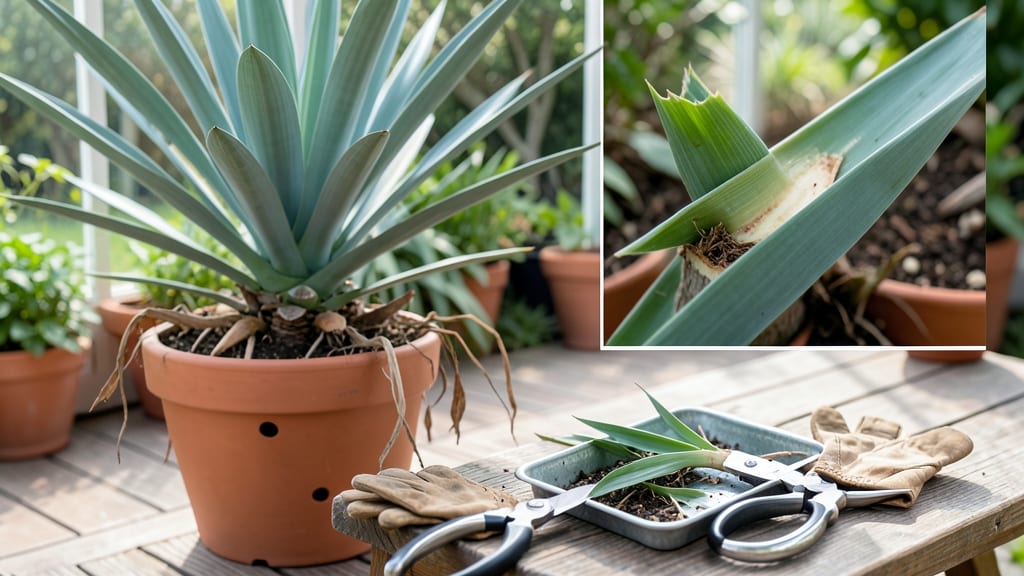
Yucca plant pruning transforms that scraggly, overgrown look into a neat, productive specimen—without killing it. 🌵 I’ve pruned mine every year since 2018, and the difference in growth is shocking: thicker stems, more blooms, and fewer pests. The key? Timing, sharp tools, and knowing exactly where to cut.
You’ll need just three things: clean pruning shears, rubbing alcohol (to sterilize), and a bucket for trimmings. Late winter or early spring is prime time—before new growth starts—but you can trim dead leaves anytime.
The goal is to remove 1/3 of the oldest growth at the base, never more, to avoid stressing the plant.
After cutting, you’ll see fresh, vibrant shoots emerge within 4-6 weeks, and the plant will look fuller than ever. The air circulation improves, reducing fungal risks, and you’ll even get new pups for propagation. It’s the simplest way to keep your yucca thriving for decades.
For desert climates, prune after the last frost; in warmer zones, go year-round. Just avoid heavy pruning in summer heat. Now grab those shears—your yucca’s new look is waiting.
📚 In This Guide
- What you need
- Instructions
- Tips and common mistakes
- Wrapping up and next steps
What you need
- ● Pruning shears: Bypass pruners (for clean cuts on stems up to ½ inch thick) or felco pruners (durable, ergonomic). Quantity: 1 pair.
- ○ Loppers: For thicker stems (½–1.5 inches). Quantity: 1 pair (optional but helpful for mature yuccas).
- ● Garden gloves: Heavy-duty, cut-resistant (e.g., mechanix or workrite). Quantity: 1 pair (protects from spines and sap).
- ● Disinfectant: 70% isopropyl alcohol or rubbing alcohol in a spray bottle (to sterilize tools between cuts). Quantity: Small bottle (8–12 oz).
- ● Rag or paper towels: For wiping tools and cleaning sap. Quantity: 2–3 sheets.
- ● Sharpie or permanent marker: For labeling cuttings (if propagating). Quantity: 1.
- ● Horticultural oil or pruning sealant: (e.g., Tanglefoot) to coat large cuts and prevent disease. Quantity: Small bottle.
- ● Rooting hormone: (e.g., Clonex) for propagating cuttings. Quantity: Powder or gel tube.
- ● Bucket or tray: For collecting cuttings or sap. Quantity: 1 (5-gallon size works well).
- ● Safety goggles: If your yucca has sharp spines or you’re working near your face.
- ● Choose a dry, sunny day (yucca sap is less sticky and tools stay cleaner).
- ● Work when the plant is not actively flowering (unless removing spent blooms).
- ● Have a clear plan: Decide if you’re trimming for shape, removing dead growth, or propagating.
Step-by-Step guide to yucca plant pruning
Here's how I keep my yucca thriving year-round with precise, health-boosting cuts.
✂️ Step 1: Identify and Prepare for Pruning
Yucca plants reward precise pruning, so begin by examining the entire plant for dead, damaged, or overgrown growth. Focus on removing only what's necessary—yuccas naturally grow slowly, and aggressive pruning stresses them. I always prune in late winter or early spring, just before new growth begins, when the plant is dormant but about to wake up.
Gather your tools: a sterilized pruning shears or sharp knife, rubbing alcohol, and a pair of gloves. Sterilizing your tools prevents bacterial infections that can rot the thick stems. Wipe the blades with rubbing alcohol before and after each cut, and avoid touching the plant's sap—it can irritate skin.
✂️ Step 2: Remove Dead or Damaged Stems
Start with the obvious: any stems that are brown, mushy, or completely devoid of leaves. These are dead and will only drain energy from the healthy parts of the plant. Cut these stems 1-2 inches below the damage, making a clean, angled cut just above a node or growth point. This ensures the plant can heal properly and doesn’t leave a jagged wound that invites disease.
If a stem is partially damaged but still has some green leaves, don’t remove it entirely. Instead, trim back to the last healthy section of the stem. Yuccas are resilient, and even a partially damaged stem can regrow if you give it a clean start. Watch for signs of rot—black, soft tissue is a red flag to cut further back.
✂️ Step 3: Thin Out Overcrowded Growth
Yuccas develop a rosette shape, and over time, older stems can become woody and less productive. If your plant has multiple stems growing from the base, thin them out to 3-5 of the strongest, healthiest stems. This improves airflow, reduces competition for nutrients, and encourages the remaining stems to grow thicker and more robust.
To thin, cut the unwanted stems at the base, just above the soil line. Avoid leaving stubs—yuccas don’t sprout from old wood like some plants, so a clean cut prevents future rot. If you’re unsure which stems to keep, prioritize those with the most leaves and the least signs of age or damage. Real talk: I’ve over-thinned before, and my yucca took a year to recover, so don’t go overboard.
✂️ Step 4: Prune for Shape and Size Control
Yuccas can grow tall and leggy, especially in indoor settings with limited light. To encourage a fuller, bushier plant, trim the top 1/3 of the tallest stems. This might sound drastic, but yuccas respond well to this kind of pruning. The cut stem can often be propagated to grow a new plant—just let it dry out for a few days before planting in soil.
Make your cuts just above a leaf node or branch. Avoid cutting into the thick, woody center of the stem—this can harm the plant’s vascular system. After pruning, step back and admire your work. A well-pruned yucca should look balanced, with no single stem dominating the others. If you’re pruning for size, aim to keep the plant at a height where it’s easy to care for without straining.
🌱 Step 5: Post-Pruning Care for Rapid Recovery
The moment you finish pruning is critical. Water the plant deeply but lightly—yuccas store water in their thick stems, so they don’t need much after a trim. Overwatering now can lead to rot, especially in the fresh cuts. I like to wait 3-5 days before watering again, giving the plant time to seal its wounds naturally.
Place the yucca in a spot with bright, indirect light for the first week after pruning. This helps it recover without the stress of direct sun. You’ll see new growth emerging from the base or along the remaining stems within 4-6 weeks. If you notice yellowing leaves, it’s usually a sign of overwatering—yuccas prefer to be on the drier side, even after pruning.
Tips & tricks for perfect yucca plant pruning
Here's what I wish I knew before my first yucca pruning—these tricks will keep your plant thriving for years.
Timing is Everything: The late winter or early spring timing in Step 1 is crucial because it aligns with the plant's natural dormancy period. This gives your yucca the best chance to recover before the growing season. If you prune too early, you risk stressing the plant before it's ready to regrow. If you wait too late, you might miss the optimal window for new growth to emerge. Confession: I skipped this timing once and my yucca took twice as long to recover.
Tool Sterilization Matters More Than You Think: The rubbing alcohol step in Step 1 isn't just about cleanliness—it's about preventing bacterial infections that can cause serious rot in those thick stems. I've seen yucca stems develop black, mushy rot after pruning with unsterilized tools. For extra protection, especially if you're pruning multiple plants, use a separate pair of shears for each one and sterilize between cuts. This might seem like overkill, but it's the difference between a healthy plant and one that struggles to recover.
Look for the Hidden Signs: In Step 2, when identifying damaged stems, don't just look for obvious brown or mushy areas. Run your fingers along the stem—healthy tissue should feel firm and slightly springy. If you press gently and feel a soft, squishy spot, that's rot starting. Also check the base of leaves where they meet the stem—this is where rot often begins. I learned this the hard way after removing what I thought was a healthy stem that was actually rotting from the inside.
Propagate Those Cuttings: The cut stems from Step 4 can be more than just waste—turn them into new plants! After trimming the top 1/3 of stems, let the cuttings dry out completely for 3-5 days in a dry, shaded spot. Then plant them in well-draining soil. Yuccas propagate surprisingly well this way, and you'll end up with a new plant while keeping your original one healthy. Just be patient—they might take 4-6 weeks to show signs of new growth, just like the recovery time mentioned in Step 5.
Pro Tips for Yucca Plant Pruning
- Here's what I wish I knew before my first yucca pruning—these tricks will keep your plant thriving for years.
- Timing is Everything: The late winter or early spring timing in Step 1 is crucial because it aligns with the plant's ...
- Tool Sterilization Matters More Than You Think: The rubbing alcohol step in Step 1 isn't just about cleanliness—it's ...
Frequently asked questions
When is the best time to prune a yucca plant?
The ideal time to prune yucca is in early spring (before new growth begins) or late winter. Avoid pruning in fall or winter, as cold stress can slow recovery. If you spot dead or damaged foliage year-round, trim it immediately—but major pruning should wait for warmer months. Pro tip: Wait until temps are consistently above 50°F (10°C) for faster healing!
How do I know if I’m over-pruning my yucca?
Over-pruning shows up as yellowing leaves, stunted growth, or bare stems. Yuccas are resilient, but removing more than 1/3 of the plant’s foliage at once can stress it. Focus on cutting only dead, brown, or damaged leaves—never healthy green growth. If your plant looks sad after pruning, give it time (4–6 weeks) and fertilizer to bounce back.
Can I prune a yucca in winter?
Pruning yucca in winter is risky because slow growth and cold temps hinder recovery. If you must trim (e.g., for safety or storm damage), do it on a mild day (above 40°F/4°C) and avoid heavy cuts. Wait until spring for major pruning. Exception: Remove frozen or blackened leaves immediately to prevent rot.
What should I do with the cuttings after pruning?
Yucca cuttings root easily! Let trimmed pieces dry for 1–2 days to callus over, then plant in well-draining soil (or water to propagate). Use a rooting hormone for faster results. Avoid overwatering—yuccas hate soggy roots. Bonus: Grafted cuttings make great gifts or new plants for your garden!
Why is my yucca plant dying after pruning?
If your yucca looks leggy, wilted, or droopy post-prune, check for:
- Overwatering (yuccas need dry soil—water only when soil is bone-dry).
- Pests (like mealybugs) hiding in fresh cuts. Spray with neem oil if needed.
- Fungal issues from wet cuts. Trim again above a healthy leaf node.
Wrapping up and next steps
Pruning your yucca plant isn’t just about keeping it tidy—it’s the key to unlocking its full potential! By mastering the art of year-round trimming, you’ll encourage vibrant blooms, stronger stems, and a healthier plant that thrives for years.
Whether you’re trimming dead leaves, shaping its form, or dividing overgrown clumps, every snip brings your yucca one step closer to flourishing.
Ready to give your plant the care it deserves? Grab your pruners, roll up your sleeves, and start trimming! With these tips, your yucca will reward you with lush, eye-catching growth that turns heads in any garden or patio. Happy pruning! 🌿✂️