
How To
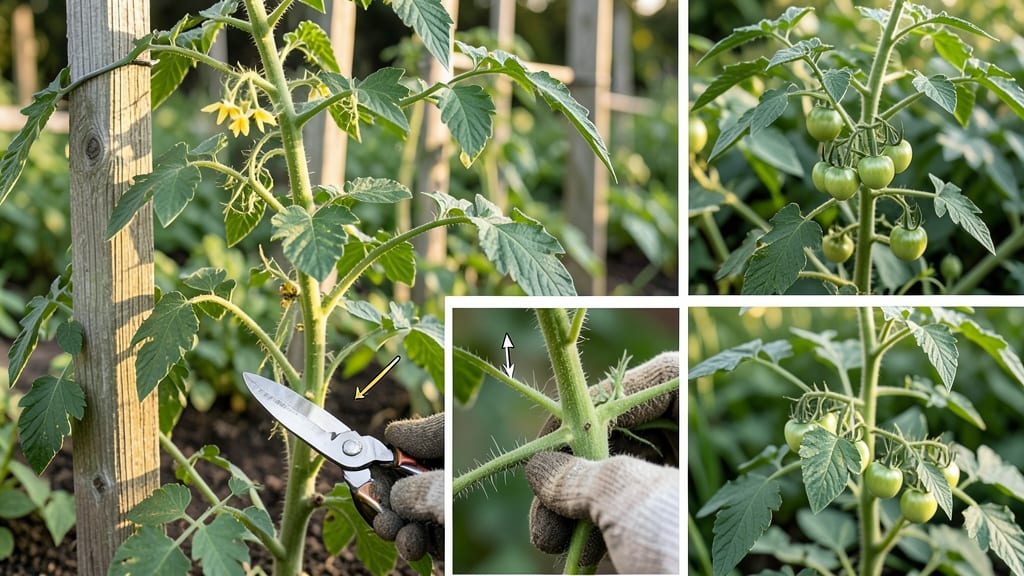
Pruning tomatoes for more fruit isn't about hacking away—it's about directing energy where it matters most. ✂️ I used to snip randomly, thinking more cuts meant bigger harvests, until I learned the three strategic cuts that actually boost yields instead of stressing plants.
Start when plants hit 18-24 inches tall, focusing on suckers (those tiny shoots between stems and leaves), bottom leaves (below the first flower cluster), and overcrowded branches. Use clean scissors or pruners—sterilize them first to prevent disease—and make cuts at a 45-degree angle just above a leaf node.
Determinate varieties need minimal pruning, while indeterminate types thrive with regular maintenance.
📚 In This Guide
- What you need
- Instructions
- Tips and common mistakes
- Wrapping up and next steps
What you need
- ● Pruning shears or sharp scissors – Choose bypass pruners (clean cuts) or sterilized scissors to avoid disease spread.
- ● Gloves – Wear garden gloves to protect your hands from thorns and dirt.
- ● Disinfectant (rubbing alcohol or bleach solution) – Clean tools between cuts to prevent bacterial/fungal infections.
- ● Garden twine or plant ties – 1-2 rolls (for indeterminate varieties to support stems).
- ● Sturdy stakes or cages – 1-2 per plant (if not already installed).
- ● Water spray bottle or hose – For rinsing tools and refreshing plants post-pruning.
- ● Hand lens or magnifying glass – For spotting hidden pests or diseases.
- ● Pruning sealant – To coat larger cuts and reduce moisture loss.
- ● Compost bin or bag – For collecting pruned leaves/stems (great for mulch!).
- ● Sunny-day schedule – Prune on a dry, overcast day to minimize stress on the plant.
Step-by-Step guide to pruning tomatoes for maximum fruit production
Here's the straightforward method I use to transform bushy tomato plants into high-yielding fruit factories.
✂️ Step 1: Remove Suckers When They're Small
Start pruning when your tomato plant reaches 12-18 inches tall—this is when suckers (those little shoots growing between the main stem and branches) first appear. Use clean, sharp pruning shears to snip them off at the base. I always make the cut just above a leaf node to prevent disease entry points.
You'll notice these suckers grow in the V-shaped junction between the main stem and a branch. Removing them early directs the plant's energy toward fruit production rather than leaf growth. The key is consistency—check for new suckers once a week during the growing season. If you see a sucker larger than 2 inches, you've missed your window; it'll compete with your fruit for nutrients.
🌿 Step 2: Thin Branches to 3-4 Main Stems
Once your plant has 3-4 strong main branches (called "trusses"), stop pruning suckers on those branches. These will bear your main fruit clusters. Look for branches that are at least 6 inches long with 3-4 leaves before deciding to keep them. I usually wait until the plant is 3 feet tall before finalizing my branch selection.
If you end up with more than 4 main stems, remove the weakest ones at the base. You'll know which to keep by their thickness—thicker stems produce stronger fruit clusters. Never leave stubs; always cut cleanly just above a leaf node. This prevents disease and encourages faster healing.
☀️ Step 3: Prune Lower Leaves for Airflow and Sunlight
When your plant reaches 4 feet tall, start removing the lowest set of leaves—those below the first fruit cluster. Use your fingers to gently pinch them off rather than cutting, which reduces the risk of spreading disease. Aim to remove every other leaf along the lower 12-18 inches of the stem. This might seem counterintuitive, but it prevents blossom end rot and improves airflow.
Watch for leaves that are yellowing or curling—these are prime candidates for removal. Healthy leaves should be deep green and firm to the touch. After pruning, give the plant a light watering to help it recover. The goal is to let sunlight reach the lower fruit clusters, which ripen more evenly when exposed to direct light.
⏰ Step 4: Time Your Final Pruning Before Harvest
Stop all pruning 4-6 weeks before your first frost date. This gives the plant enough time to recover and set new fruit. In my zone 7 garden, that means I finish pruning by mid-August. If you prune too late, the plant may not have enough time to produce a second flush of fruit before cold weather arrives.
As harvest approaches, focus on removing only diseased or damaged leaves. You'll know it's time to stop pruning entirely when you see green tomatoes starting to turn color. At this stage, the plant's energy should be directed toward ripening existing fruit rather than growing new leaves or branches.
Tips & tricks for pruning tomatoes for maximum fruit production
These simple but game-changing techniques will help you transform a wild tomato plant into a high-yielding fruit machine.
The Timing Secret: In Step 1, when you're removing suckers, focus on those growing in the V-shaped junction between the main stem and branches. These little shoots are energy vampires—they steal nutrients meant for your tomatoes. I've seen plants double their yield just by removing suckers once a week during the growing season. The key is acting fast: suckers larger than 2 inches have already started competing with your fruit.
Branch Selection Strategy: During Step 2, when choosing your 3-4 main stems, look for branches that are at least 6 inches long with 3-4 leaves. Thicker stems are your best bet—they'll support heavier fruit loads. I've learned the hard way that keeping too many weak branches leads to smaller tomatoes and more disease issues. Always cut cleanly just above a leaf node to prevent disease entry points.
Airflow and Sunlight Hack: In Step 3, when you're removing lower leaves, aim to create a 12-18 inch gap between the soil and your first fruit cluster. This might seem counterintuitive, but it dramatically reduces the risk of blossom end rot and helps sunlight reach those lower tomatoes. I've noticed my lower fruit ripens 2-3 days faster when I do this properly. Always use your fingers to pinch off leaves rather than cutting—the less you damage the plant, the faster it recovers.
Frost Date Awareness: The 4-6 week window before your first frost is critical for Step 4. In my zone 7 garden, that means stopping pruning by mid-August. If you prune too late, your plant won't have time to recover and set new fruit before cold weather arrives. Watch for green tomatoes starting to turn color—that's your signal to stop all pruning and let the plant focus on ripening existing fruit.
Pro Tips for Prune Tomatoes For More Fruit
- These simple but game-changing techniques will help you transform a wild tomato plant into a high-yielding fruit machine.
- The Timing Secret: In Step 1, when you're removing suckers, focus on those growing in the V-shaped junction between the main stem and branches.
- Branch Selection Strategy: During Step 2, when choosing your 3-4 main stems, look for branches that are at least 6 inches long with 3-4 leaves.
Frequently asked questions
Got questions about pruning tomatoes? You’re not alone! Here are some of the most common concerns—and their answers—to help you prune like a pro and maximize your harvest.
Why should I prune tomatoes at all if it seems like extra work?
Pruning isn’t just about aesthetics—it’s about quality and quantity! By removing suckers (those little shoots in the leaf joints), you redirect energy from leaf growth to fruit production. Plus, pruned plants are easier to monitor for pests and diseases. Think of it as giving your tomato plant a spa day—it’ll thank you with bigger, juicier tomatoes!
When is the best time to prune tomatoes for maximum fruit?
Prune early and often! Start when your plant is about 12 inches tall, and keep trimming suckers (those small shoots) every 1-2 weeks during the growing season. For indeterminate varieties (the ones that keep growing), prune throughout the season. For determinate (bush) tomatoes, minimal pruning is needed—just remove diseased or crowded leaves. Pro tip: Avoid pruning too late in the day, as it can stress the plant.
What if I accidentally prune too much? Can I fix it?
No need to panic! If you’ve over-pruned, your tomato plant will likely bounce back—especially if it’s young and healthy. Focus on keeping the main stem and lower leaves intact, and avoid cutting into the main stem (the thick central stalk). Over time, the plant will regrow, and you’ll still get fruit. Just don’t prune more than 1/3 of the plant’s foliage at once.
Will pruning tomatoes affect flavor or yield if I live in a hot/dry climate?
In hot or dry climates, pruning can actually help flavor and yield by improving air circulation and reducing stress. However, leave more leaves than you would in cooler climates to provide shade for the fruit (preventing sunscald). If your area gets <1 inch of rain weekly, consider light pruning or none at all for bush varieties. Water deeply after pruning to help the plant recover.
What should I do if my tomato plant looks stressed after pruning?
Stressed plants may wilt or drop leaves, but this is usually temporary. To help your tomato recover:
- Water deeply at the base (not overhead).
- Avoid fertilizing for a week to let it heal.
- Provide shade if it’s extremely hot (use a light cloth or shade cloth).
- Monitor for pests—stressed plants attract them!
Wrapping up and next steps
Pruning your tomato plants might seem intimidating, but with just three simple cuts—removing suckers, trimming lower leaves, and pruning side shoots—you’ll unlock a bounty of healthier plants and more delicious fruit! 🌱 The key is consistency, patience, and confidence in your green thumb.
Now that you’re armed with the know-how, grab those shears and get ready to watch your garden thrive.
Ready to take it further? Experiment with different pruning techniques or try growing heirloom varieties for even bigger rewards. Happy gardening—your future salads and sauces are waiting! 🍅✨